# Connecting SenseCAP to InfluxDB via Node-RED **SenseCAP K1100 - The Sensor Prototype Kit** represents Seeed Studio concentrating the essence of LoRa® communication on technology and edge intelligence products, for the easiest deploying and mastering of LoRa® and IoT applications.

## About InfluxDB **InfluxDB** is an open source time series database, focusing on high-performance reading, high-performance writing, efficient storage and real-time analysis of massive time series data. In addition to native protocols such as HTTP and UDP, it is also compatible with communication protocols of components such as CollectD, Graphite, OpenTSDB, and Prometheus. Widely used in DevOps monitoring, IoT monitoring, real-time analysis and other scenarios.
The content of this chapter will continue to use the Node-RED introduced earlier and facilitate the management of the K1100 kit in InfluxDB through the use of Node-RED. If you haven't installed or don't know what Node-RED is, please refer to [Node-RED & SenseCAP Tutorials](https://wiki.seeedstudio.com/K1100_sensecap_node-red/). ## Create MQTT Node **Step 1.** Start Node-RED Start Node-RED by typing the command `node-red` in the terminal and open a browser and enter the address **http://localhost:1880** in the address bar to access the editor of Node-RED. **Step 2.** Create MQTT Node We use **Network -> mqtt in** node and configure mqtt in the format of the SenseCAP API as requested in the [previous tutorial](https://wiki.seeedstudio.com/K1100_sensecap_node-red/#mqtt-node). - Server: openstream.api.sensecap.seeed.cc - Port: 1883 - Protocol: MQTT V3.1.1 - Client ID: The format is `org--` - `` Your organization ID. We have obtained it in the [Get the SenseCAP API](#jump1). - `` uses your own randomly generated numbers or lowercase letters. - Topic Format: `/device_sensor_data/////`
OrgID 
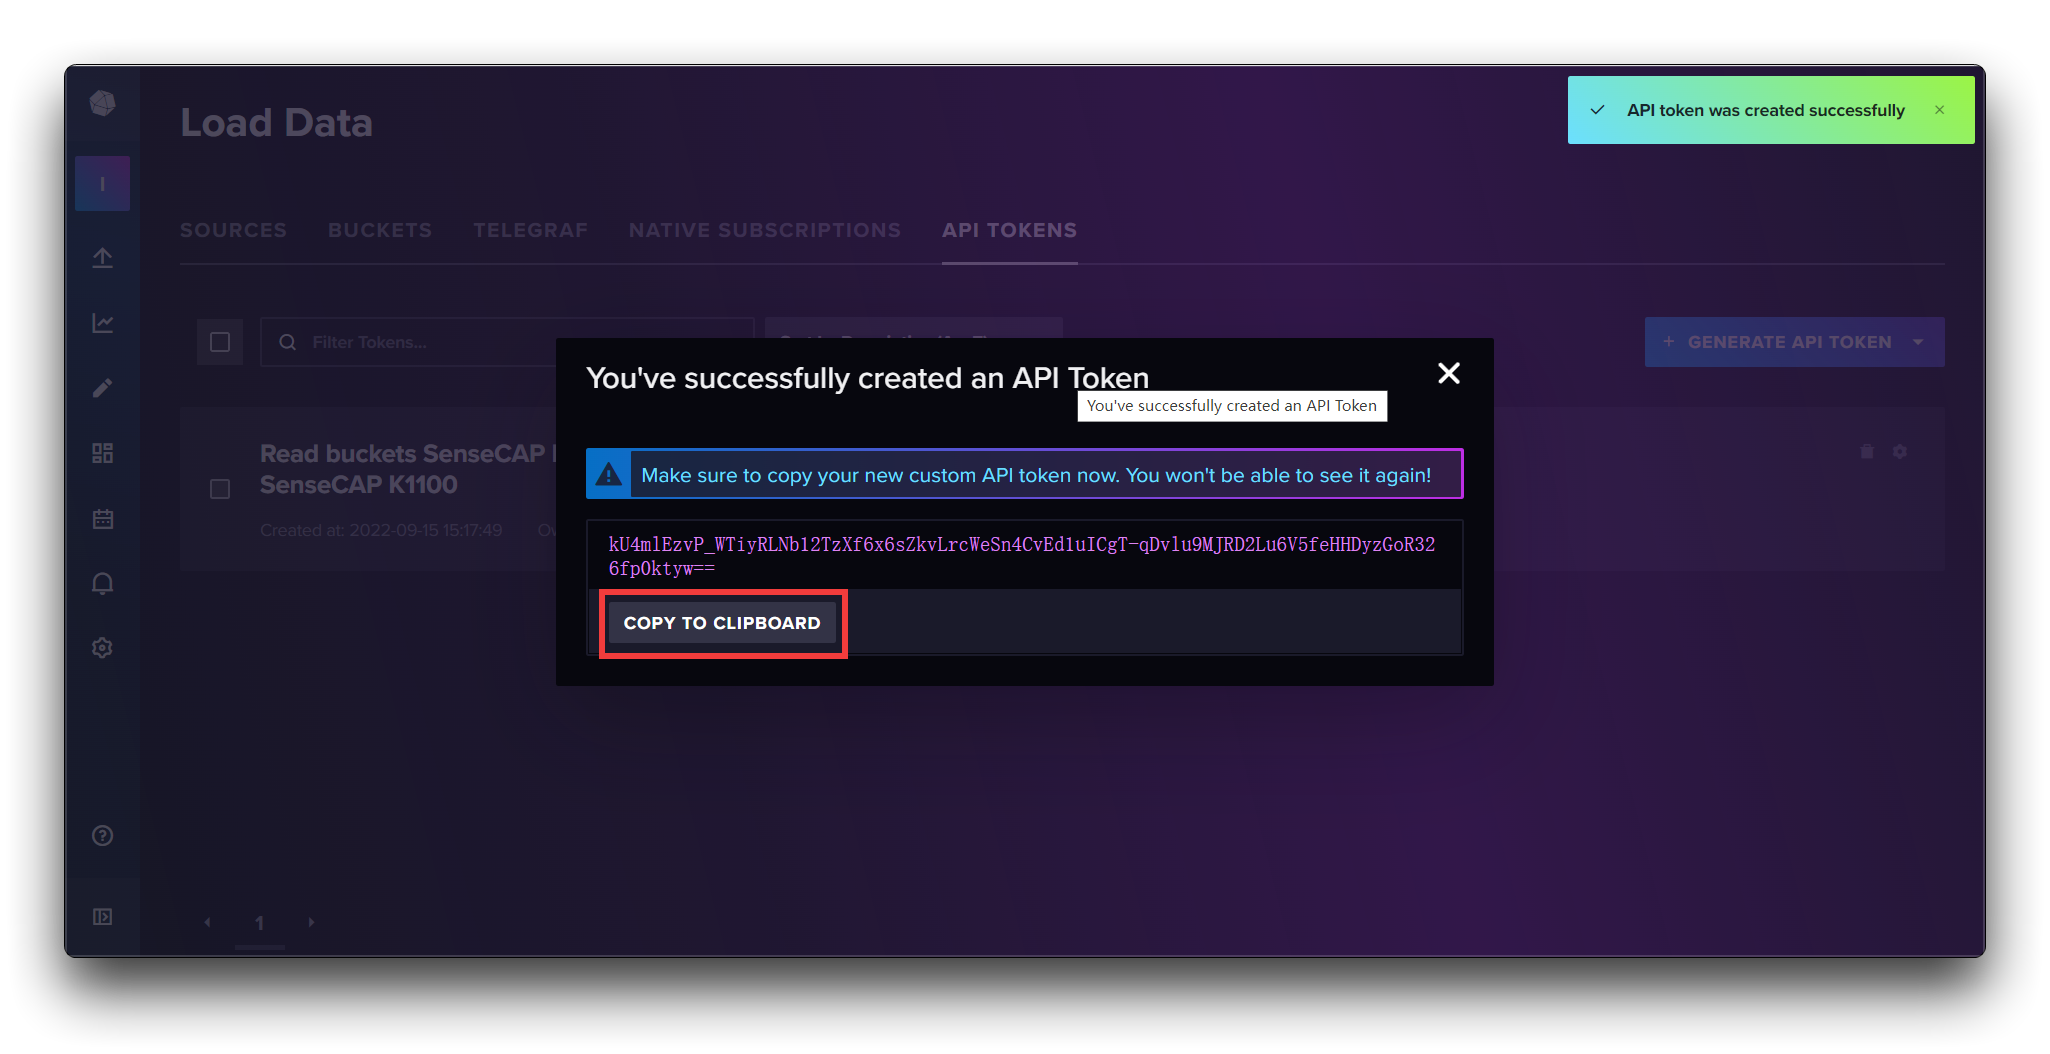
Your organization ID. We have obtained it in the Get the SenseCAP API.
DevEUI Unique identification of sensor devices. This information can be found on the sticker on the back of the Grove - Wio E5, as well as in the SenseCAP console device.
Channel A physical interface on the device to which the sensor is connected. For the K1100 kit, the default value here is 1.
Reserved Reserved Fields.
MeasurementID Measured value ID. This ID can be found in the Measurement IDs section of the SenseCAP documentation
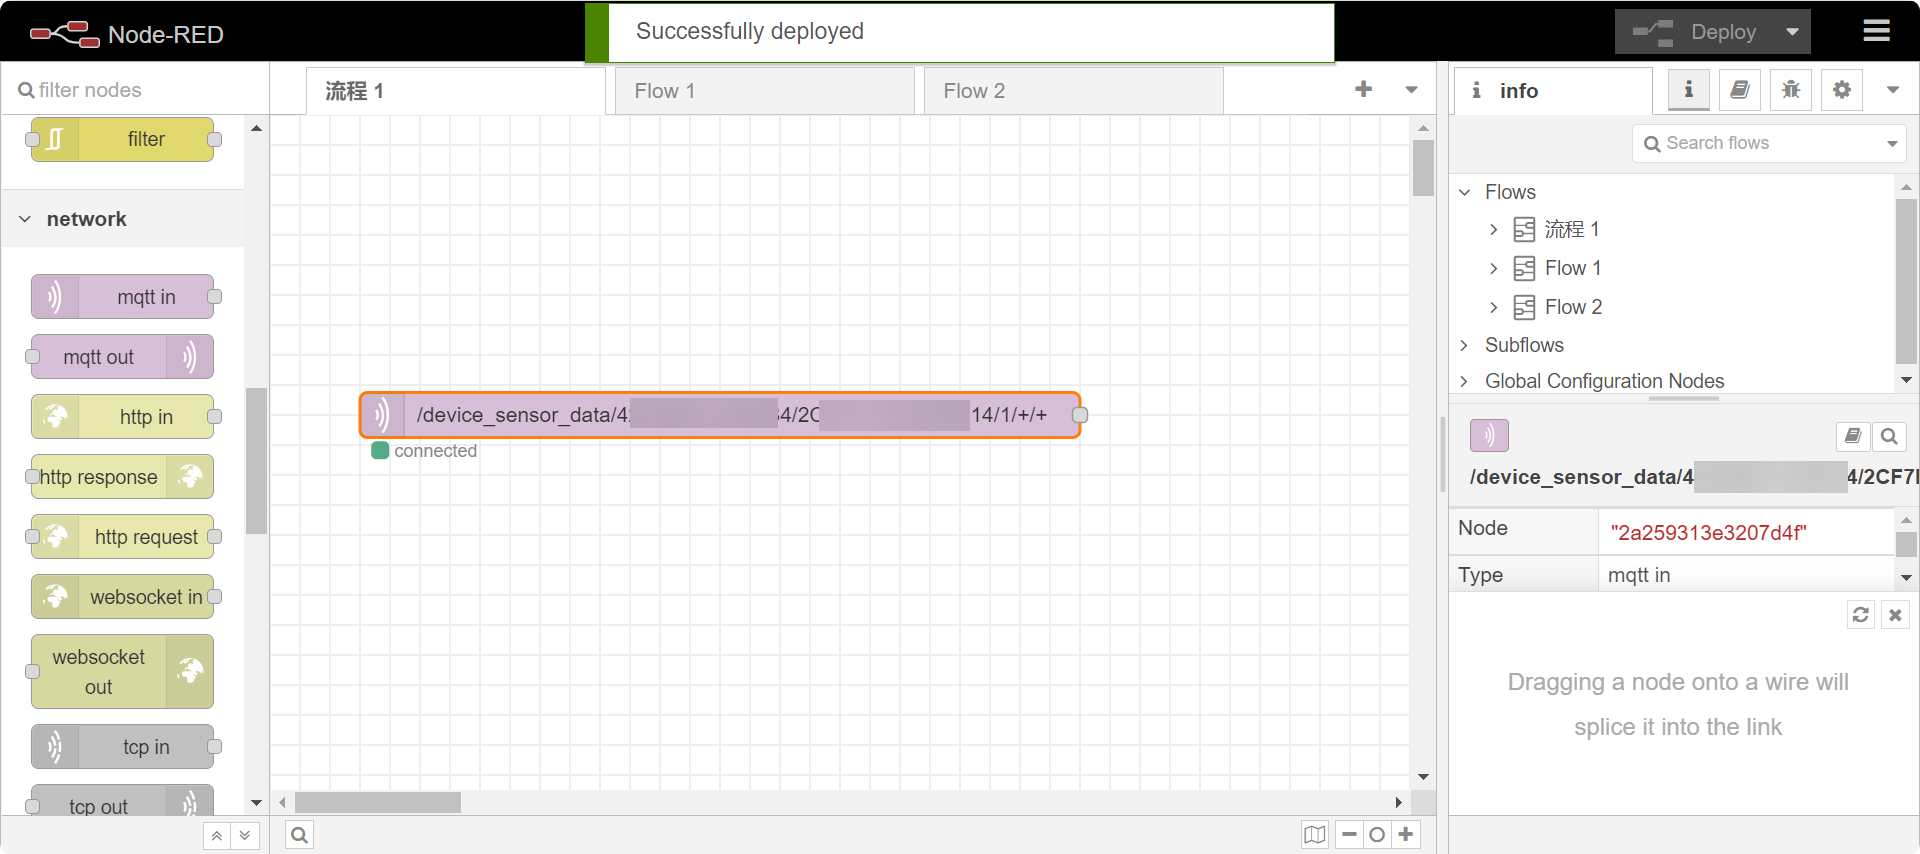
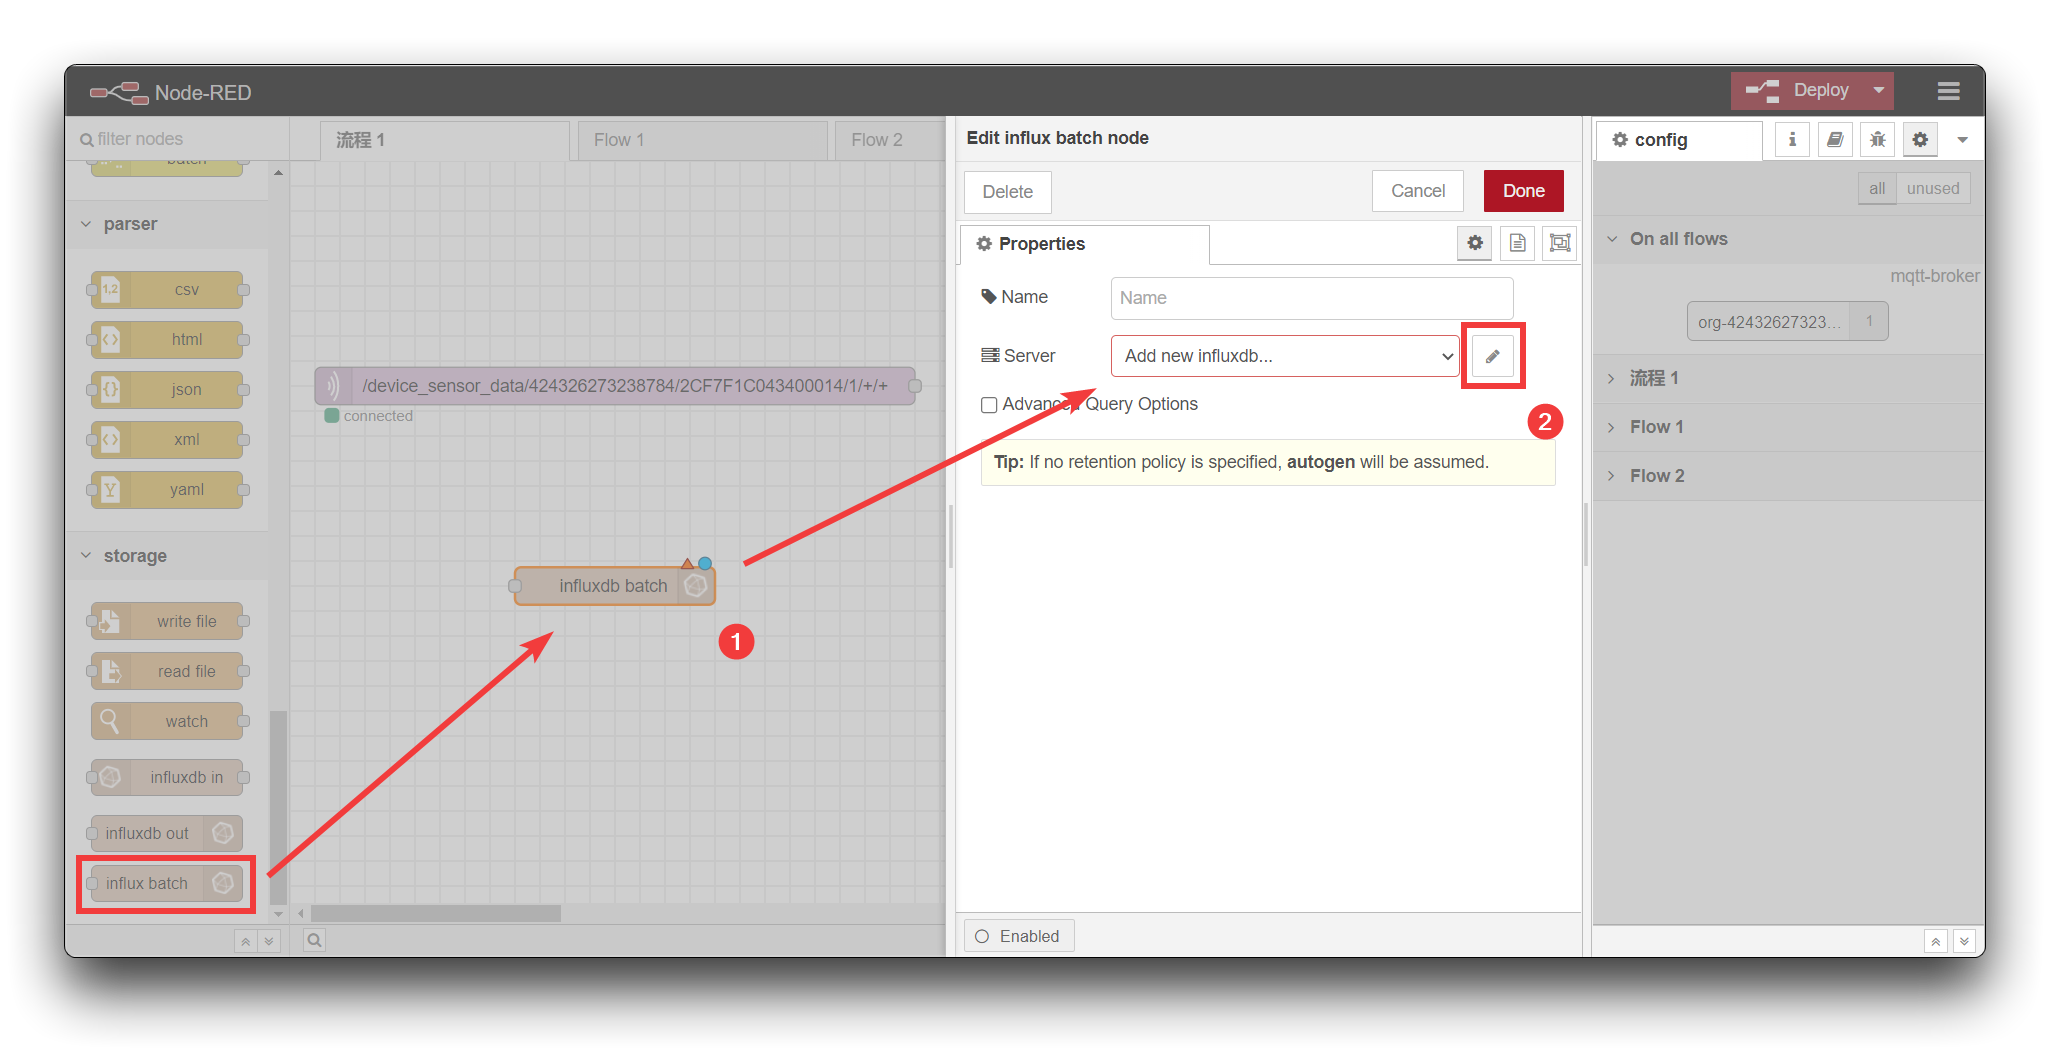
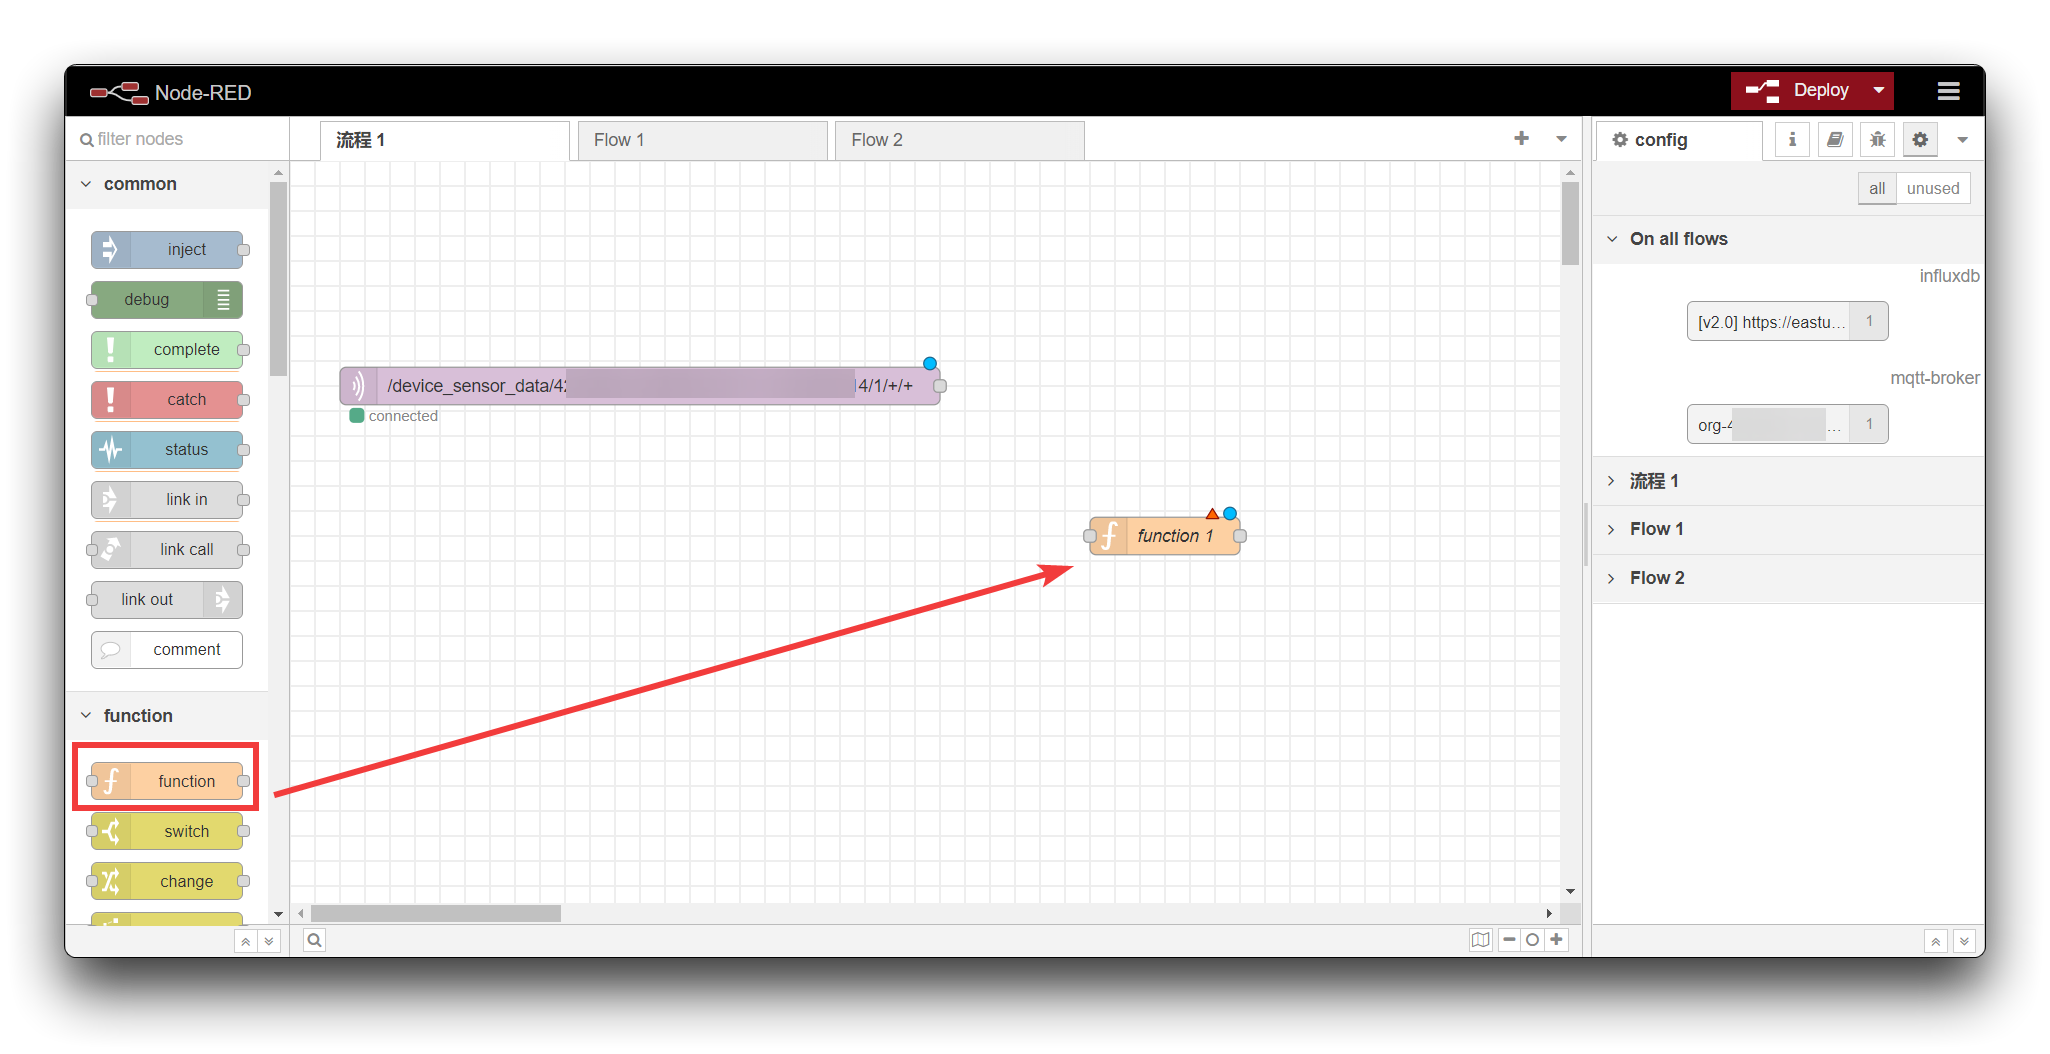
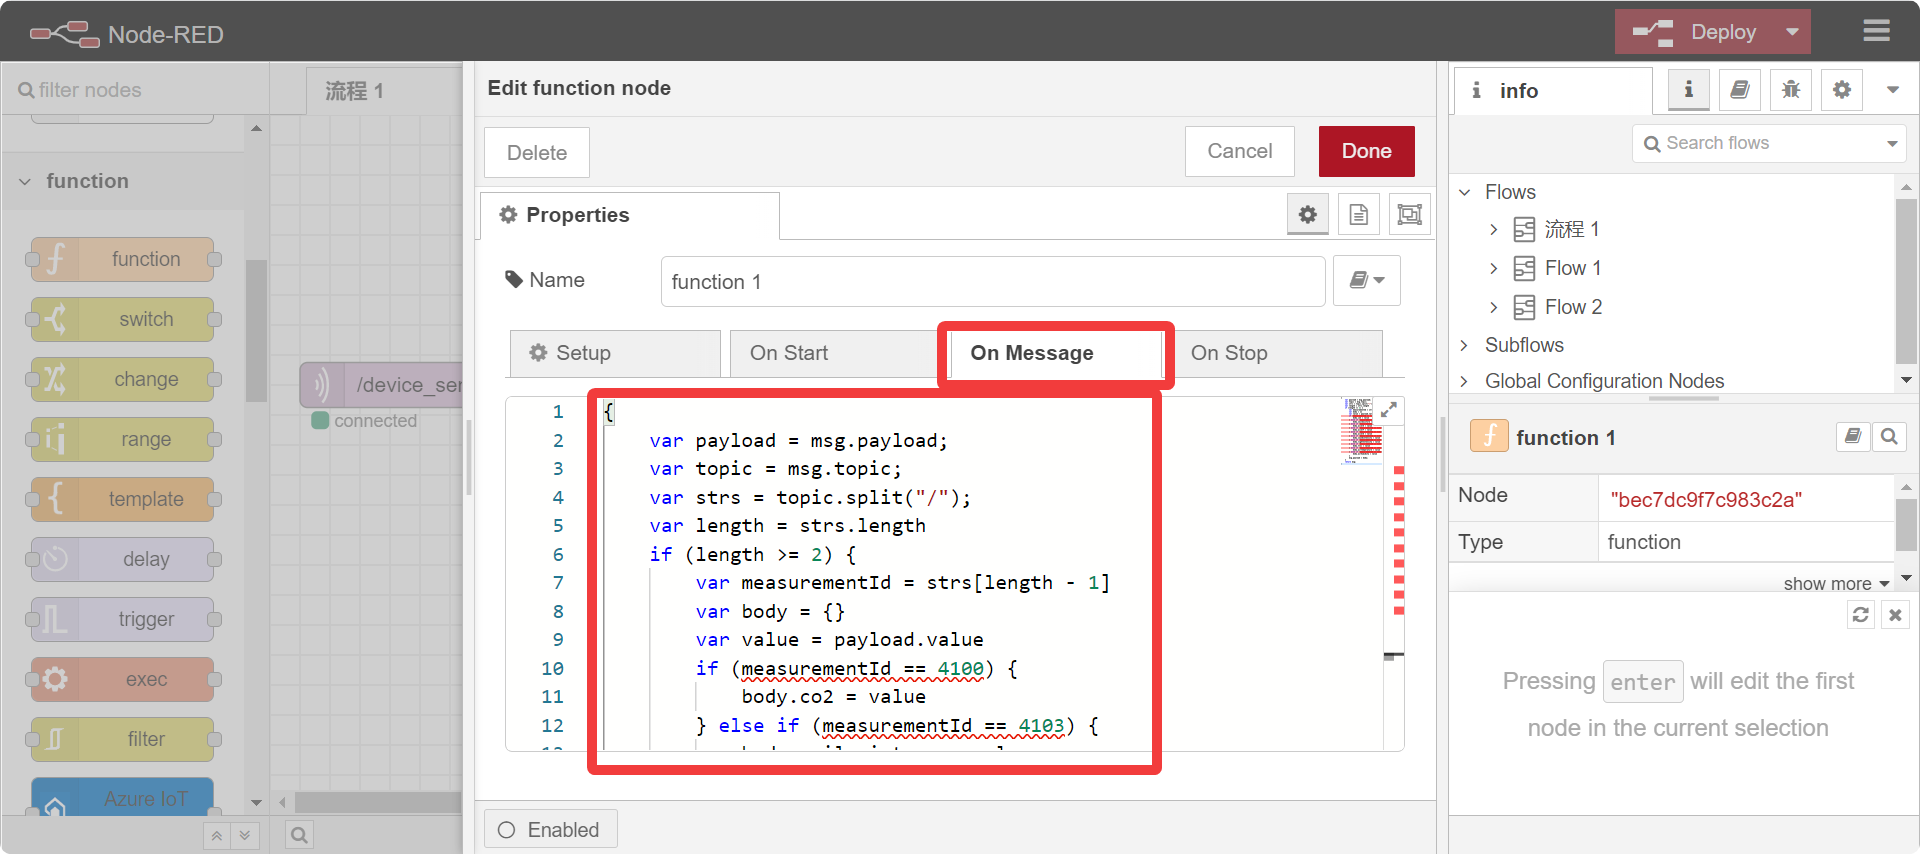
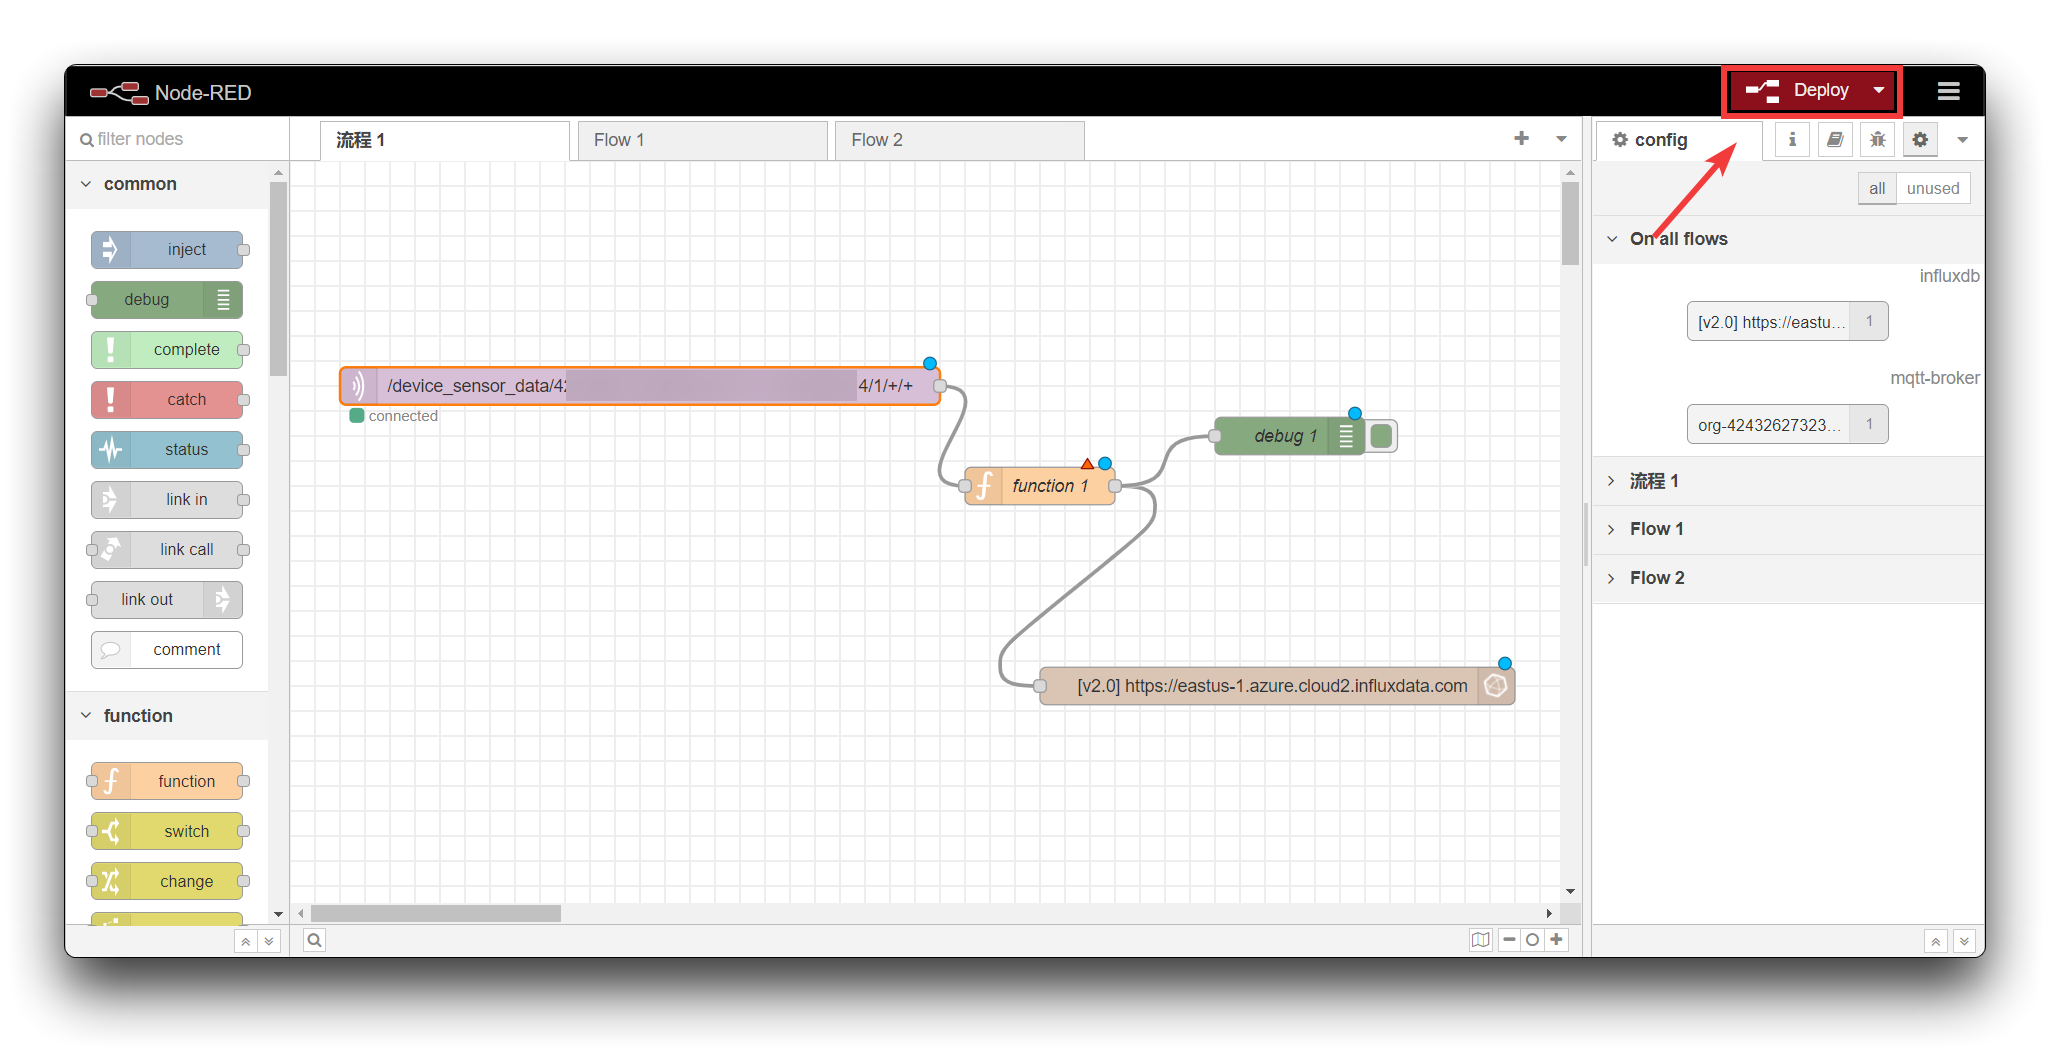
**Step 3.** Validate MQTT nodes 
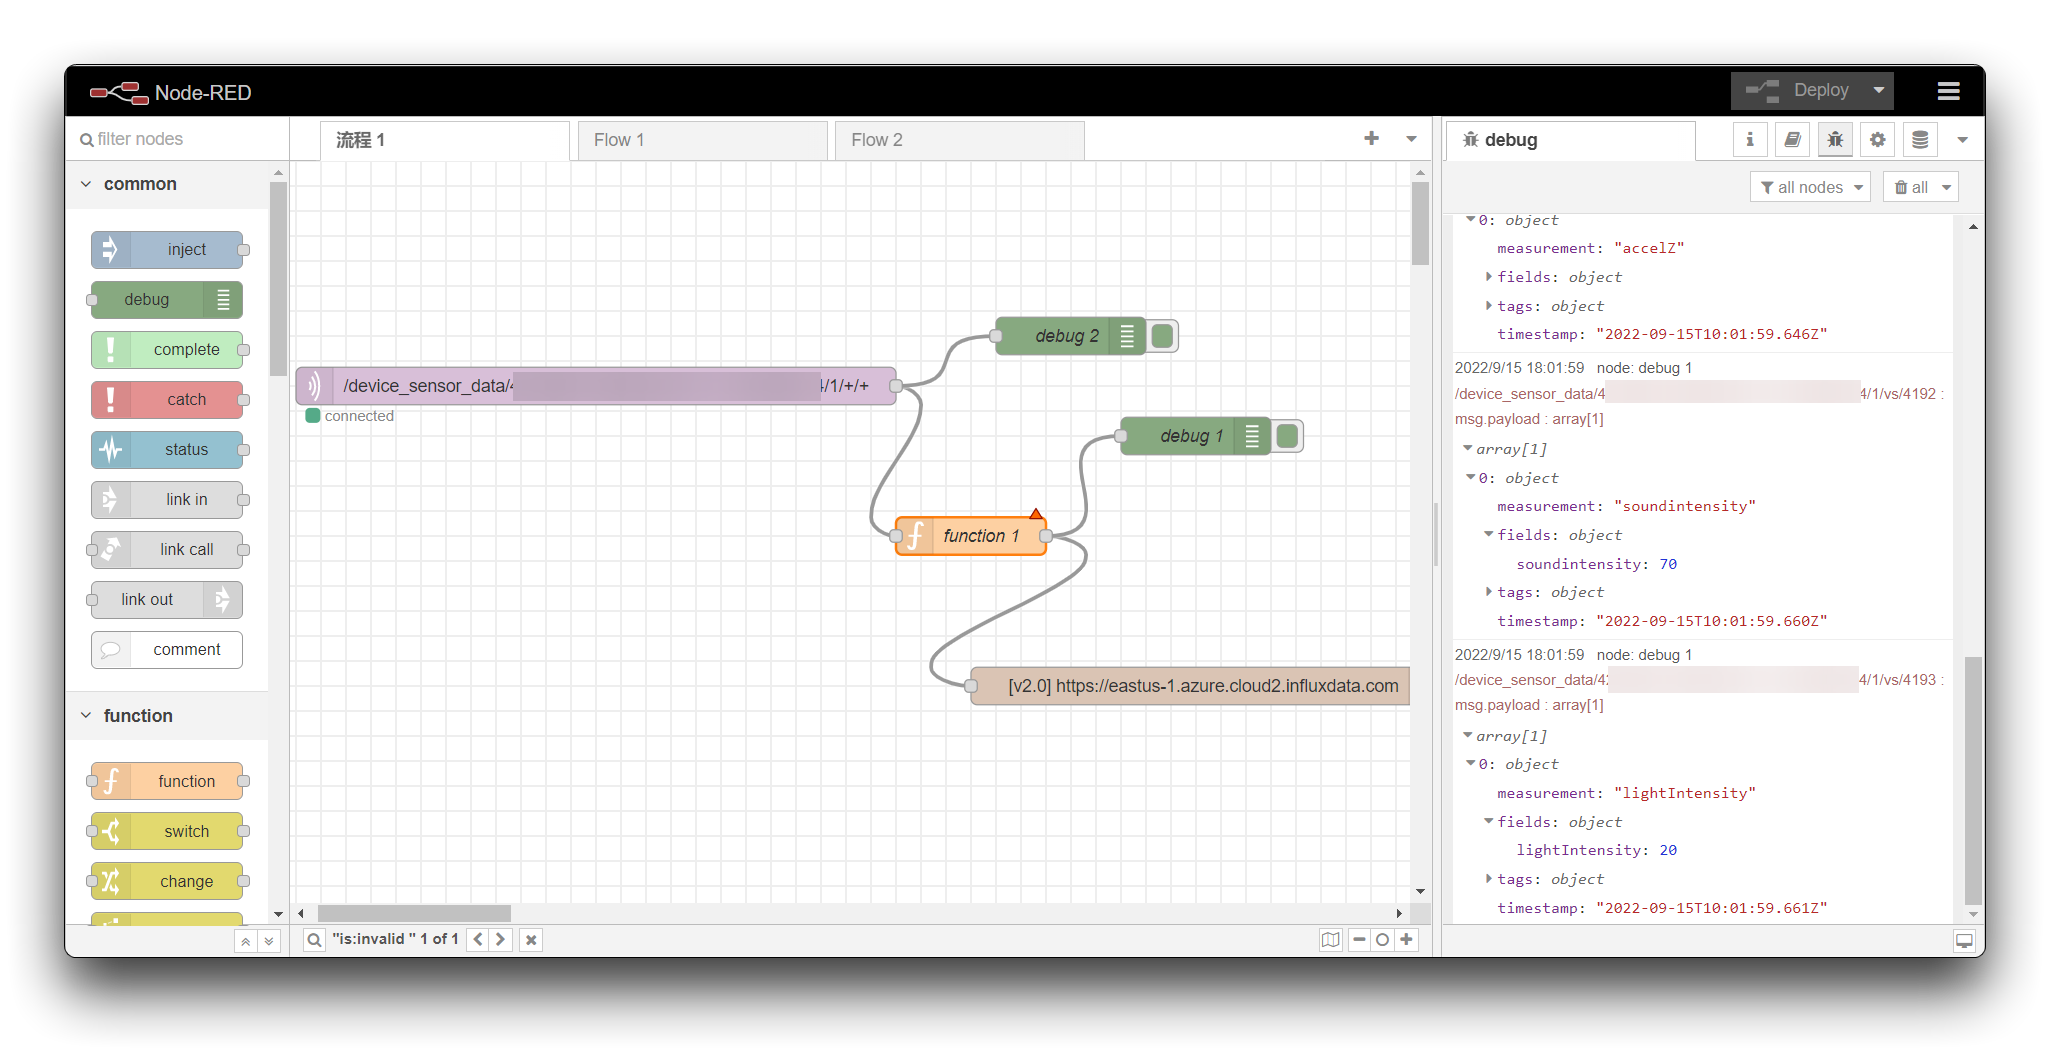
Once configured, please click the **Deploy** button in the top right corner to check if the configuration was successful. If it is filled in correctly, then the word **Connected** will be displayed.
## Configure InfluxDB **Step 1.** Register or login to InfluxDB If you have already registered with InfluxDB, then please login on the [InfluxDB website](https://www.influxdata.com/).
If you do not use or have registered with InfluxDB, then please complete your registration and login [here](https://cloud2.influxdata.com/signup).
!!!Tip When registering, a page may pop up asking you to choose the provider, you can choose according to your preference, or just pick one.
**Step 2.** Obtain API Token As shown below, please click on **Bucket**.
Then click on CREATE BUCKET.
Enter the name in the new pop-up window and select the free data retention period - 30 days.
Then, as shown below, please click on **API Tokens**.
Then we choose to create a **Custom API Token**.
Give **read** and **write** permissions to the Buckets we have just created and click the Create button below.
Once it has been created, you can save it by copying the API Token to the pasteboard. Please save it to a safe location for now, we will use it in a later step.
!!!Attention If you close the window here, you will not be able to get this API Token again. ## Configure Node-RED **Step 1.** Download InfluxDB Paletts Click on the upper-right menu bar and select Settings.
Search and install **node-red-contrib-influxdb** in the **Paletts -> Install**.
Add **influx.batch** from the storage bar on the left,double-click it to enter the configuration page, then click the edit button to edit **influx.batch** node.
**Step 2.** Edit **influx.batch** node: - **Version**: 2.0. - **URL**: Obtained from the **Settings** -> **Orgnization Profile**.
- **TOKEN**: Which you generate in **Obtain API Token** Section.
When you have finished click on the **Add** button in the top right hand corner to return to the properties page of the influx batch, at this point please fill in your Orgnization(The default is the email address you use to register with InfluxDB) and Bucket name.
**Step 3.** Configure the function node Data reporting to InfluxDB needs to follow a specific data format, so it's necessary to add a function node to process the data format.
Drag out the function node from the function bar on the left, double-click it to enter the edit page, then copy the code to On Message.
```javascript { var payload = msg.payload; var topic = msg.topic; var strs = topic.split("/"); var length = strs.length if (length >= 2) { var measurementId = strs[length - 1] var body = {} var value = payload.value if (measurementId == 4100) { body.co2 = value measurement = "co2" } else if (measurementId == 4103) { body.soilmoisture = value measurement = "soilmoisture" } else if (measurementId == 4150) { body.accelX = value measurement = "accelX" } else if (measurementId == 4151) { body.accelY = value measurement = "accelY" } else if (measurementId == 4152) { body.accelZ = value measurement = "accelZ" } else if (measurementId == 4192) { body.soundintensity = value measurement = "soundintensity" } else if (measurementId == 4193) { body.lightIntensity = value measurement = "lightIntensity" } else if (measurementId == 4195) { body.tvoc = value measurement = "tvoc" } else if (measurementId == 4097) { body.airtemperature = value measurement = "airtemperature" } else if (measurementId == 4098) { body.airhumidity = value measurement = "airhumidity" } else if (measurementId == 4175) { body.AIdetection_1 = value measurement = "AIdetection_1" } else if (measurementId == 4176) { body.AIdetection_2 = value measurement = "AIdetection_2" } else if (measurementId == 4177) { body.AIdetection_3 = value measurement = "AIdetection_3" } else if (measurementId == 4178) { body.AIdetection_4 = value measurement = "AIdetection_4" } else if (measurementId == 4179) { body.AIdetection_5 = value measurement = "AIdetection_5" } else if (measurementId == 4180) { body.AIdetection_6 = value measurement = "AIdetection_6" } else if (measurementId == 4181) { body.AIdetection_7 = value measurement = "AIdetection_7" } else if (measurementId == 4182) { body.AIdetection_8 = value measurement = "AIdetection_8" } else if (measurementId == 4183) { body.AIdetection_9 = value measurement = "AIdetection_9" } else if (measurementId == 4184) { body.AIdetection_10 = value measurement = "AIdetection_10" } msg.payload = [{ measurement: measurement, fields: body, tags: { device: "SenseCAP K1100" }, timestamp: new Date() }]; } return msg; } ``` Then we connect all the nodes and click on the **Deploy** button and if everything is set up correctly you will be able to see the mqtt in node showing connected. If you want to see the logging information of the data, you can add a debug node after the function node.
Once the Wio Terminal starts powering up and working and starts sending data to SenseCAP PaaS server, then we can check the data on Node-RED debug log.
## Configure InfluxDB visual dashboards To get a more visual view of the sensor data, we can draw some line graphs. Go back to InflucDB Cloud and click on **CREATE DASHBOARD** to **ADD CELL**.
If SenseCAP has started sending data messages to InfluxDB, then you can see the sensor's label on this page. For the content of the data you want to display, we just tick the box.
## Troubleshoot > Q1: Why can't I find the Palette in Node-RED? A: If you cannot find the Palette in the settings, check your terminal for an error message when you start Node-RED.
The most common scenario is that your npm version is too old to start the Palette editor. If your situation is as described above, run **Powershell as administrator** and enter the following command to upgrade npm. ```sh npm install -g npm ``` Then just restart Node-RED. ## Tech Support Please do not hesitate to submit the issue into our [forum](https://forum.seeedstudio.com/). > **Upgradable to Industrial Sensors** SenseCAP K1100 serves as a gateway to the higher-end SenseCAP LoRaWAN® series of industrial outdoor sensors. Users can prototype multiple AIoT applications with this kit, after which they can scale them up to the robust, long-life, and industrial SenseCAP sensors.