# Advanced Wi-Fi Usage
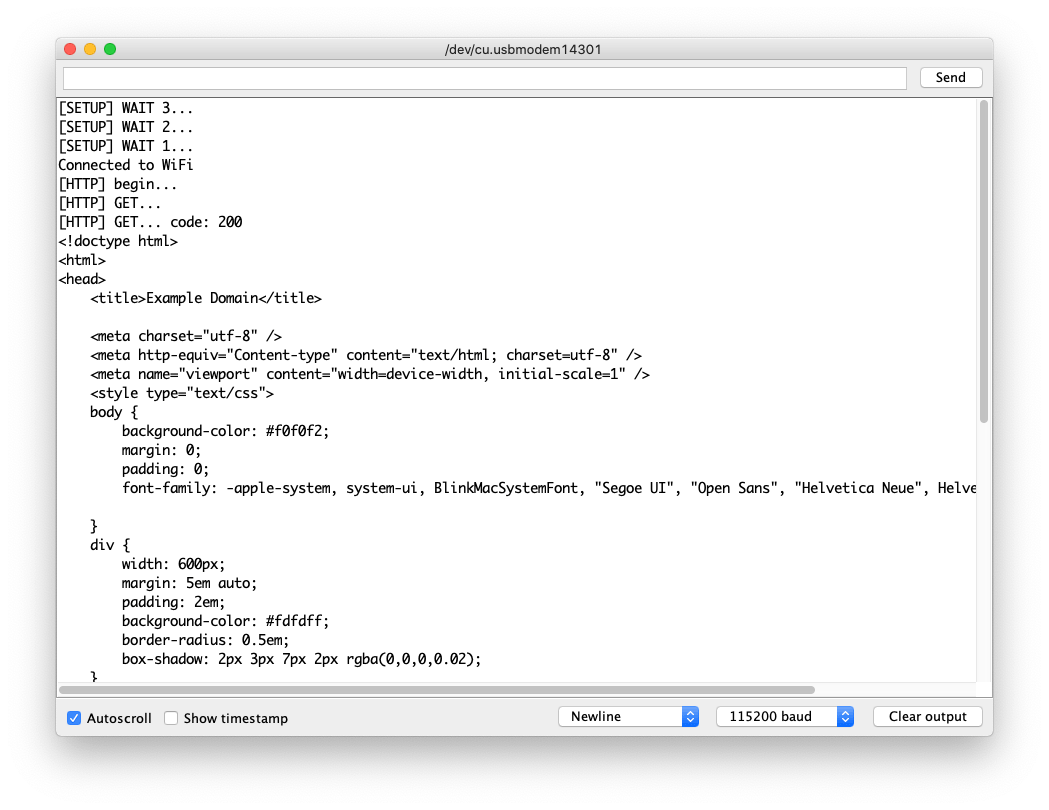
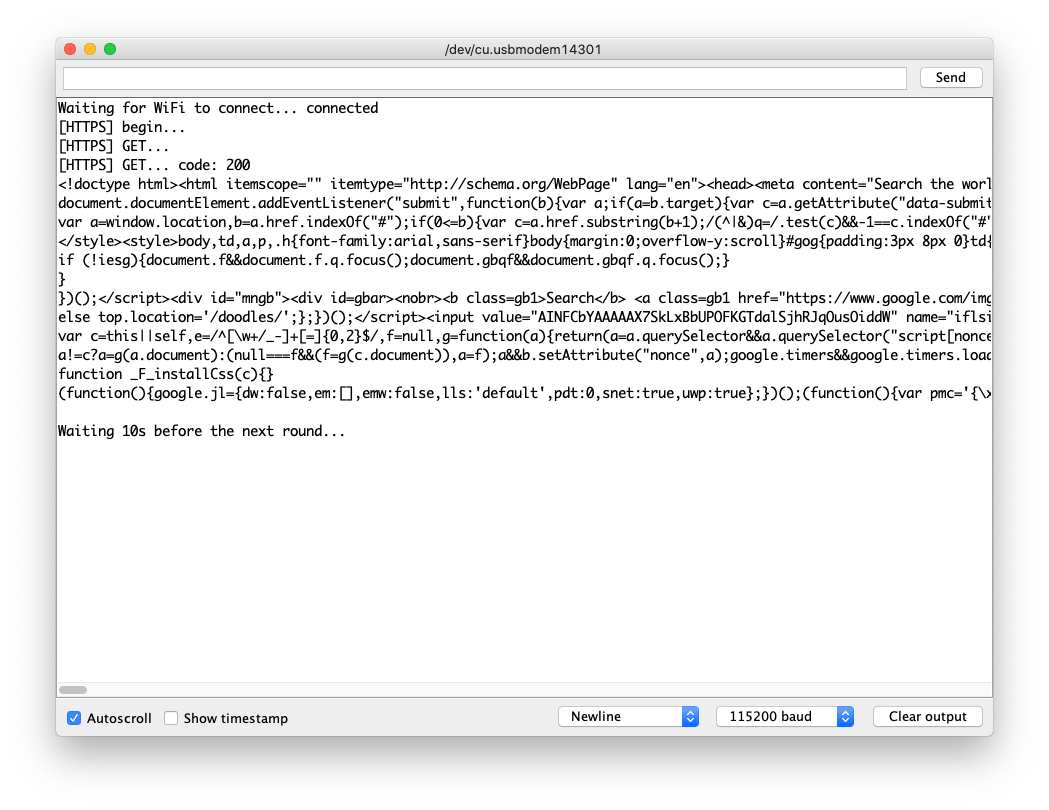
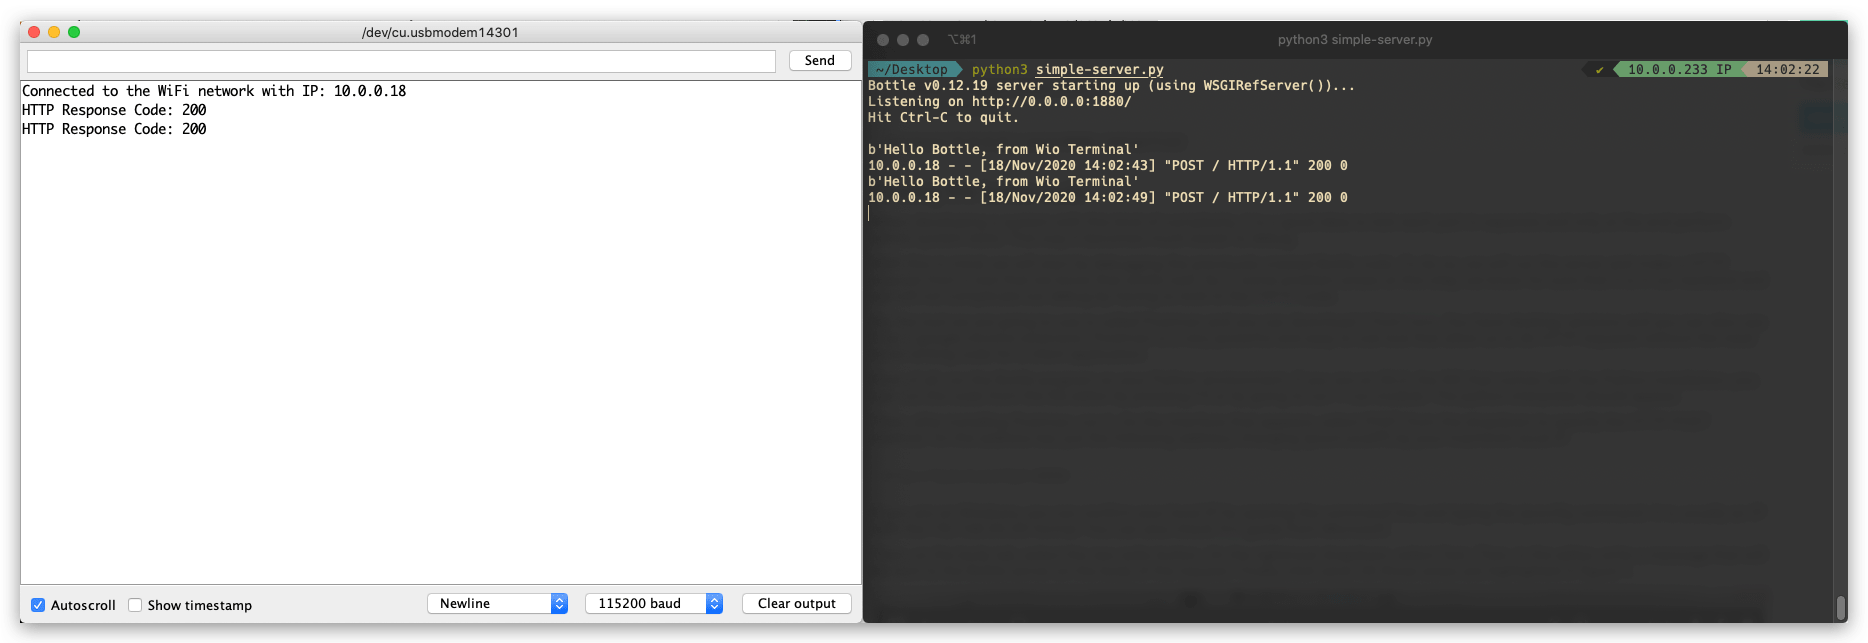
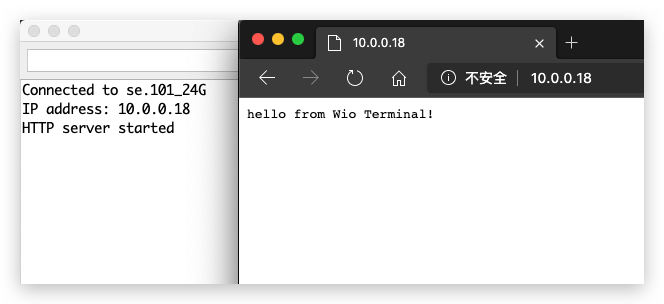
This wiki introduces some of the advanced library usage of the Wi-Fi such as **HTTPClient, DNSServer and WebServer** Libraries. With these libraries implemented, you are able to develop your IoT projects with simple APIs.
Please make sure you have followed the [**Network Overview**](https://wiki.seeedstudio.com/Wio-Terminal-Network-Overview/) to update the **latest firmware and dependent libraries**.

!!!Note
Make sure that **the RTL8720 firmware version is >= v2.0.2**
## HTTPClient Usage
HTTPClient is used to make **HTTP GET, POST and PUT** requests to a web server very easy. Here are some examples for you to get started!
### HTTP GET Example
This is an example of using HTTPClient for a simple HTTP connection and prints response back to the Serial Monitor.

- Change the `yourNetwork` and `yourPassword` to your WiFi **ssid** and **password**.
- Upload the code to Wio Terminal.
```cpp
#include
#include
const char* ssid = "yourNetwork";
const char* password = "yourPassword";
void setup() {
Serial.begin(115200);
WiFi.begin(ssid, password);
while (WiFi.status() != WL_CONNECTED) { //Check for the connection
delay(500);
Serial.println("Connecting..");
}
Serial.print("Connected to the WiFi network with IP: ");
Serial.println(WiFi.localIP());
}
void loop() {
// wait for WiFi connection
if((WiFi.status() == WL_CONNECTED)) {
HTTPClient http;
Serial.print("[HTTP] begin...\n");
// configure traged server and url
http.begin("http://www.example.com/index.html"); //HTTP
Serial.print("[HTTP] GET...\n");
// start connection and send HTTP header
int httpCode = http.GET();
// httpCode will be negative on error
if(httpCode > 0) {
// HTTP header has been send and Server response header has been handled
Serial.printf("[HTTP] GET... code: %d\n", httpCode);
// file found at server
if(httpCode == HTTP_CODE_OK) {
String payload = http.getString();
Serial.println(payload);
}
} else {
Serial.printf("[HTTP] GET... failed, error: %s\n", http.errorToString(httpCode).c_str());
}
http.end();
}
delay(5000);
}
```
### HTTPs GET Example
This is the **HTTPs connection** using HTTPClient library. You may refer this to send HTTPs GET request to websites that you want to visit!
!!!Note
You can find out website's root CA following [**this**](https://wiki.seeedstudio.com/Wio-Terminal-Wi-Fi/#obtaining-websites-root-ca).

- Change the `yourNetwork` and `yourPassword` to your WiFi **ssid** and **password**.
- Upload the code to Wio Terminal.
```cpp
#include
#include
#include
const char* ssid = "yourNetwork";
const char* password = "yourPassword";
const char* test_root_ca = \
"-----BEGIN CERTIFICATE-----\n"
"MIIESjCCAzKgAwIBAgINAeO0mqGNiqmBJWlQuDANBgkqhkiG9w0BAQsFADBMMSAw\n"
"HgYDVQQLExdHbG9iYWxTaWduIFJvb3QgQ0EgLSBSMjETMBEGA1UEChMKR2xvYmFs\n"
"U2lnbjETMBEGA1UEAxMKR2xvYmFsU2lnbjAeFw0xNzA2MTUwMDAwNDJaFw0yMTEy\n"
"MTUwMDAwNDJaMEIxCzAJBgNVBAYTAlVTMR4wHAYDVQQKExVHb29nbGUgVHJ1c3Qg\n"
"U2VydmljZXMxEzARBgNVBAMTCkdUUyBDQSAxTzEwggEiMA0GCSqGSIb3DQEBAQUA\n"
"A4IBDwAwggEKAoIBAQDQGM9F1IvN05zkQO9+tN1pIRvJzzyOTHW5DzEZhD2ePCnv\n"
"UA0Qk28FgICfKqC9EksC4T2fWBYk/jCfC3R3VZMdS/dN4ZKCEPZRrAzDsiKUDzRr\n"
"mBBJ5wudgzndIMYcLe/RGGFl5yODIKgjEv/SJH/UL+dEaltN11BmsK+eQmMF++Ac\n"
"xGNhr59qM/9il71I2dN8FGfcddwuaej4bXhp0LcQBbjxMcI7JP0aM3T4I+DsaxmK\n"
"FsbjzaTNC9uzpFlgOIg7rR25xoynUxv8vNmkq7zdPGHXkxWY7oG9j+JkRyBABk7X\n"
"rJfoucBZEqFJJSPk7XA0LKW0Y3z5oz2D0c1tJKwHAgMBAAGjggEzMIIBLzAOBgNV\n"
"HQ8BAf8EBAMCAYYwHQYDVR0lBBYwFAYIKwYBBQUHAwEGCCsGAQUFBwMCMBIGA1Ud\n"
"EwEB/wQIMAYBAf8CAQAwHQYDVR0OBBYEFJjR+G4Q68+b7GCfGJAboOt9Cf0rMB8G\n"
"A1UdIwQYMBaAFJviB1dnHB7AagbeWbSaLd/cGYYuMDUGCCsGAQUFBwEBBCkwJzAl\n"
"BggrBgEFBQcwAYYZaHR0cDovL29jc3AucGtpLmdvb2cvZ3NyMjAyBgNVHR8EKzAp\n"
"MCegJaAjhiFodHRwOi8vY3JsLnBraS5nb29nL2dzcjIvZ3NyMi5jcmwwPwYDVR0g\n"
"BDgwNjA0BgZngQwBAgIwKjAoBggrBgEFBQcCARYcaHR0cHM6Ly9wa2kuZ29vZy9y\n"
"ZXBvc2l0b3J5LzANBgkqhkiG9w0BAQsFAAOCAQEAGoA+Nnn78y6pRjd9XlQWNa7H\n"
"TgiZ/r3RNGkmUmYHPQq6Scti9PEajvwRT2iWTHQr02fesqOqBY2ETUwgZQ+lltoN\n"
"FvhsO9tvBCOIazpswWC9aJ9xju4tWDQH8NVU6YZZ/XteDSGU9YzJqPjY8q3MDxrz\n"
"mqepBCf5o8mw/wJ4a2G6xzUr6Fb6T8McDO22PLRL6u3M4Tzs3A2M1j6bykJYi8wW\n"
"IRdAvKLWZu/axBVbzYmqmwkm5zLSDW5nIAJbELCQCZwMH56t2Dvqofxs6BBcCFIZ\n"
"USpxu6x6td0V7SvJCCosirSmIatj/9dSSVDQibet8q/7UK4v4ZUN80atnZz1yg==\n"
"-----END CERTIFICATE-----\n";
WiFiClientSecure client;
void setup() {
Serial.begin(115200);
WiFi.begin(ssid, password);
while (WiFi.status() != WL_CONNECTED) { //Check for the connection
delay(500);
Serial.println("Connecting..");
}
Serial.print("Connected to the WiFi network with IP: ");
Serial.println(WiFi.localIP());
client.setCACert(test_root_ca);
}
void loop() {
if(&client) {
{
// Add a scoping block for HTTPClient https to make sure it is destroyed before WiFiClientSecure *client is
HTTPClient https;
Serial.print("[HTTPS] begin...\n");
if (https.begin(client, "https://www.google.com/index.html")) { // HTTPS
Serial.print("[HTTPS] GET...\n");
// start connection and send HTTP header
int httpCode = https.GET();
// httpCode will be negative on error
if (httpCode > 0) {
// HTTP header has been send and Server response header has been handled
Serial.printf("[HTTPS] GET... code: %d\n", httpCode);
// file found at server
if (httpCode == HTTP_CODE_OK || httpCode == HTTP_CODE_MOVED_PERMANENTLY) {
String payload = https.getString();
Serial.println(payload);
}
} else {
Serial.printf("[HTTPS] GET... failed, error: %s\n", https.errorToString(httpCode).c_str());
}
https.end();
} else {
Serial.printf("[HTTPS] Unable to connect\n");
}
// End extra scoping block
}
} else {
Serial.println("Unable to create client");
}
Serial.println();
Serial.println("Waiting 10s before the next round...");
delay(10000);
}
```
### HTTP POST Example
This is an example of sending **HTTP POST request** using the HTTPClient from Wio Terminal to a Web Server. For this demonstration, we are using python to set up a simple web server on our PC that can receive and response to HTTP requests.

#### Python Server Code
First, we need to use `pip` to install the needed **bottle library** in Python. Run the following in terminal to install bottle:
```sh
pip install bottle
```
Once imported the bottle, copy the following code and save as **`simple-server.py`**. You may also change the port to something else you prefer but make this matches with the Arduino side.
```py
from bottle import run, request, post
@post('/')
def index():
data = request.body.read()
print(data)
run(host='0.0.0.0', port=1880, debug=True)
```
#### Arduino Code
- Change the `yourNetwork` and `yourPassword` to your WiFi **ssid** and **password**.
- Upload the code to Wio Terminal.
- Check the Terminal and you can see the incoming HTTP request message from Wio Terminal.
```cpp
#include
#include
const char* ssid = "yourNetwork";
const char* password = "yourPassword";
// Change the following IP to your computer's IP running the server, make sure the Port also match
const char* yourLocalIp = "http://10.0.0.233:1880/";
void setup() {
Serial.begin(115200);
WiFi.begin(ssid, password);
while (WiFi.status() != WL_CONNECTED) { //Check for the connection
delay(500);
Serial.println("Connecting..");
}
Serial.print("Connected to the WiFi network with IP: ");
Serial.println(WiFi.localIP());
}
void loop() {
if(WiFi.status()== WL_CONNECTED){ //Check WiFi connection status
HTTPClient http;
http.begin(yourLocalIp); //Specify destination for HTTP request
http.addHeader("Content-Type", "text/plain"); //Specify content-type header
int httpResponseCode = http.POST("Hello Bottle, from Wio Terminal"); //Send the actual POST request
if(httpResponseCode>0){
Serial.print("HTTP Response Code: ");
Serial.println(httpResponseCode); //Print return code
}else{
Serial.print("Error on sending request: ");
Serial.println(httpResponseCode);
}
http.end(); //Free resources
}else{
Serial.println("Error in WiFi connection");
}
delay(5000); //Send a request every 5 seconds
}
```
## WebServer Usage
With the help of **WebServer library**, you can set up Web Server running on the Wio Terminal. By accessing the server with a browser running on any computer connected to the same network as the Wio Terminal, you can **control hardware from the webpage, read value of a sensor** and much more!
### Simple HelloServer Example
This sets up a simple web server on the connected network using Wio Terminal.

- Change the `yourNetwork` and `yourPassword` to your WiFi **ssid** and **password**.
- Upload the code to Wio Terminal.
- Access the web server by entering Wio Terminal's IP from the same network using browser.
```cpp
#include
#include
#include
const char *ssid = "yourNetwork";
const char *password = "yourPassword";
WebServer server(80);
const int led = 13;
void handleRoot() {
digitalWrite(led, 1);
server.send(200, "text/plain", "hello from Wio Terminal!");
digitalWrite(led, 0);
}
void handleNotFound() {
digitalWrite(led, 1);
String message = "File Not Found\n\n";
message += "URI: ";
message += server.uri();
message += "\nMethod: ";
message += (server.method() == HTTP_GET) ? "GET" : "POST";
message += "\nArguments: ";
message += server.args();
message += "\n";
for (uint8_t i = 0; i < server.args(); i++) {
message += " " + server.argName(i) + ": " + server.arg(i) + "\n";
}
server.send(404, "text/plain", message);
digitalWrite(led, 0);
}
void setup(void) {
pinMode(led, OUTPUT);
digitalWrite(led, 0);
Serial.begin(115200);
WiFi.mode(WIFI_STA);
WiFi.begin(ssid, password);
// Wait for connection
while (WiFi.status() != WL_CONNECTED) {
delay(500);
Serial.print(".");
}
Serial.print("Connected to ");
Serial.println(ssid);
Serial.print("IP address: ");
Serial.println(WiFi.localIP());
server.on("/", handleRoot);
server.on("/inline", []() {
server.send(200, "text/plain", "this works as well");
});
server.onNotFound(handleNotFound);
server.begin();
Serial.println("HTTP server started");
}
void loop(void) {
server.handleClient();
}
```
### HTTP Authentication Web Server Example
This examples sets up a web server that requires Authentication process, which can be very useful in some cases for security purposes.

- Change the `yourNetwork` and `yourPassword` to your WiFi **ssid** and **password**.
- Upload the code to Wio Terminal.
- Access the web server by entering Wio Terminal's IP from the same network using browser, and enter pre-set username and password.
```cpp
#include
#include
const char *ssid = "yourNetwork";
const char *password = "yourPassword";
WebServer server(80);
const char* www_username = "admin";
const char* www_password = "password";
void setup() {
Serial.begin(115200);
WiFi.mode(WIFI_STA);
WiFi.begin(ssid, password);
if (WiFi.waitForConnectResult() != WL_CONNECTED) {
Serial.println("WiFi Connect Failed! Rebooting...");
delay(1000);
NVIC_SystemReset(); // Reset Wio Terminal
}
server.on("/", []() {
if (!server.authenticate(www_username, www_password)) {
return server.requestAuthentication();
}
server.send(200, "text/plain", "Login OK");
});
server.begin();
Serial.print("Open http://");
Serial.print(WiFi.localIP());
Serial.println("/ in your browser to see it working");
}
void loop() {
server.handleClient();
}
```
## DNSServer Usage
We talked about **WebServer**, that we use **IP address** to access it. But if you want to access it by typing in the domain name (such as `www.google.com`), then you need to use the **DNSServer**.

- Using DNSServer must be under **AP mode**.
- Introduce the corresponding library `#include `.
- Declare `DNSServer` objects.
- Start the DNS server using the `start()` method.
- Process requests from clients using the `processNextRequest()` method.
- Upload the Code to Wio Terminal and Connect your PC to the `DNSServer example` Wi-Fi.
- Type `www.wioterminal.com` and `www.wioterminal.com/p1`.
```cpp
#include
#include
#include
IPAddress local_IP(192, 168, 1, 1);
IPAddress gateway(192, 168, 1, 1);
IPAddress subnet(255, 255, 255, 0);
const byte DNS_PORT = 53;
DNSServer dnsServer;
WebServer webserver(80);
void handleRoot()
{
webserver.send(200, "text/plain", "Root page accessed via domain name");
}
void handleP1()
{
webserver.send(200, "text/plain", "Page 1 accessed via domain name");
}
void setup()
{
WiFi.mode(WIFI_AP);
WiFi.softAPConfig(local_IP, gateway, subnet);
WiFi.softAP("DNSServer example");
webserver.on("/", handleRoot);
webserver.on("/p1", handleP1);
dnsServer.start(DNS_PORT, "www.wioterminal.com", local_IP); //Start the DNS service, example.com is the registered domain name.
webserver.begin();
}
void loop()
{
dnsServer.processNextRequest();
webserver.handleClient();
}
```
## mDNS Usage
**What is Multicast DNS(mDNS)?**
The [multicast DNS (mDNS)](https://en.wikipedia.org/wiki/Multicast_DNS) protocol resolves hostnames to IP addresses within small networks that do not include a local name server. Multicast DNS is designed for small networks and is intended to increase their user-friendliness. The idea is that users can connect devices in secret LANs without any issues.
### Install the Seeed_Arduino_rpcmDNS
1. Visit the [**Seeed_Arduino_rpcmDNS**](https://github.com/Seeed-Studio/Seeed_Arduino_rpcmDNS) repositories and download the entire repo to your local drive.
2. Now, the Seeed_Arduino_rpcmDNS library can be installed to the Arduino IDE. Open the Arduino IDE, and click `sketch` -> `Include Library` -> `Add .ZIP Library`, and choose the `Seeed_Arduino_rpcmDNS` file that you've have just downloaded.
### mDNS Web Server Example
This is an example that sets up a mDNS web server on the Wio Terminal so that other device connected in the same network can browse the webserver at a defined site.

- Change the `yourNetwork` and `yourPassword` to your WiFi **ssid** and **password**.
- Upload the code to Wio Terminal.
- Access the web server by entering http://WioTerminal.local/ from the same network using browser, and enter pre-set username and password.
```cpp
#include
#include
#include
const char* ssid = "yourNetwork";
const char* password = "yourPassword";
// TCP server at port 80 will respond to HTTP requests
WiFiServer server(80);
void setup(void)
{
Serial.begin(115200);
while(!Serial){
;
}
Serial.printf("Setup Start \r\n");
// Connect to WiFi network
WiFi.begin(ssid, password);
Serial.println("");
// Wait for connection
while (WiFi.status() != WL_CONNECTED) {
delay(500);
Serial.print(".");
}
Serial.println("");
Serial.print("Connected to ");
Serial.println(ssid);
Serial.print("IP address: ");
Serial.println(WiFi.localIP());
// Set up mDNS responder:
// - first argument is the domain name, in this example
// the fully-qualified domain name is "esp8266.local"
// - second argument is the IP address to advertise
// we send our IP address on the WiFi network
if (!MDNS.begin("WioTerminal")) {
Serial.println("Error setting up MDNS responder!");
while(1) {
delay(1000);
}
}
Serial.println("mDNS responder started");
// Start TCP (HTTP) server
server.begin();
Serial.println("TCP server started");
// Add service to MDNS-SD
MDNS.addService("http", "tcp", 80);
Serial.printf("Setup Done \r\n");
}
void loop(void)
{
// Check if a client has connected
WiFiClient client = server.available();
if (!client) {
return;
}
Serial.println("");
Serial.println("New client");
// Wait for data from client to become available
while(client.connected() && !client.available()){
delay(1);
}
// Read the first line of HTTP request
String req = client.readStringUntil('\r');
// First line of HTTP request looks like "GET /path HTTP/1.1"
// Retrieve the "/path" part by finding the spaces
int addr_start = req.indexOf(' ');
int addr_end = req.indexOf(' ', addr_start + 1);
if (addr_start == -1 || addr_end == -1) {
Serial.print("Invalid request: ");
Serial.println(req);
return;
}
req = req.substring(addr_start + 1, addr_end);
Serial.print("Request: ");
Serial.println(req);
String s;
if (req == "/")
{
IPAddress ip = WiFi.localIP();
String ipStr = String(ip[0]) + '.' + String(ip[1]) + '.' + String(ip[2]) + '.' + String(ip[3]);
s = "HTTP/1.1 200 OK\r\nContent-Type: text/html\r\n\r\n\r\nHello from Wio Terminal at ";
s += ipStr;
s += "\r\n\r\n";
Serial.println("Sending 200");
}
else
{
s = "HTTP/1.1 404 Not Found\r\n\r\n";
Serial.println("Sending 404");
}
client.print(s);
client.stop();
Serial.println("Done with client");
}
```
### mDNS-SD Example
This is a [mDNS-SD(Service Discovery)](https://en.wikipedia.org/wiki/Zero-configuration_networking#DNS-SD) example which allows you to discover services in the same network.

- Change the `yourNetwork` and `yourPassword` to your WiFi **ssid** and **password**.
- Upload the code to Wio Terminal.
```cpp
#include
#include
#include
const char* ssid = "yourNetwork";
const char* password = "yourPassword";
// TCP server at port 80 will respond to HTTP requests
WiFiServer server(80);
void setup(void)
{
Serial.begin(115200);
while(!Serial){
;
}
Serial.printf("Setup Start \r\n");
// Connect to WiFi network
WiFi.begin(ssid, password);
Serial.println("");
// Wait for connection
while (WiFi.status() != WL_CONNECTED) {
delay(500);
Serial.print(".");
}
Serial.println("");
Serial.print("Connected to ");
Serial.println(ssid);
Serial.print("IP address: ");
Serial.println(WiFi.localIP());
// Set up mDNS responder:
// - first argument is the domain name, in this example
// the fully-qualified domain name is "esp8266.local"
// - second argument is the IP address to advertise
// we send our IP address on the WiFi network
if (!MDNS.begin("WioTerminal")) {
Serial.println("Error setting up MDNS responder!");
while(1) {
delay(1000);
}
}
Serial.println("mDNS responder started");
// Start TCP (HTTP) server
server.begin();
Serial.println("TCP server started");
// Add service to MDNS-SD
MDNS.addService("http", "tcp", 80);
Serial.printf("Setup Done \r\n");
}
void loop(void)
{
// Check if a client has connected
WiFiClient client = server.available();
if (!client) {
return;
}
Serial.println("");
Serial.println("New client");
// Wait for data from client to become available
while(client.connected() && !client.available()){
delay(1);
}
// Read the first line of HTTP request
String req = client.readStringUntil('\r');
// First line of HTTP request looks like "GET /path HTTP/1.1"
// Retrieve the "/path" part by finding the spaces
int addr_start = req.indexOf(' ');
int addr_end = req.indexOf(' ', addr_start + 1);
if (addr_start == -1 || addr_end == -1) {
Serial.print("Invalid request: ");
Serial.println(req);
return;
}
req = req.substring(addr_start + 1, addr_end);
Serial.print("Request: ");
Serial.println(req);
String s;
if (req == "/")
{
IPAddress ip = WiFi.localIP();
String ipStr = String(ip[0]) + '.' + String(ip[1]) + '.' + String(ip[2]) + '.' + String(ip[3]);
s = "HTTP/1.1 200 OK\r\nContent-Type: text/html\r\n\r\n\r\nHello from Wio Terminal at ";
s += ipStr;
s += "\r\n\r\n";
Serial.println("Sending 200");
}
else
{
s = "HTTP/1.1 404 Not Found\r\n\r\n";
Serial.println("Sending 404");
}
client.print(s);
client.stop();
Serial.println("Done with client");
}
```
## WiFiManager Usage
We have ported the well known WiFi Manager to the Wio Terminal platform so that you may use your phone or other device to configure Wi-Fi settings for your Wio Terminal!
### Install the Seeed_Arduino_rpcWiFiManager
1. Visit the [**Seeed_Arduino_rpcWiFiManager**](https://github.com/Seeed-Studio/Seeed_Arduino_rpcWiFiManager) repositories and download the entire repo to your local drive.
2. Now, the Seeed_Arduino_rpcWiFiManager library can be installed to the Arduino IDE. Open the Arduino IDE, and click `sketch` -> `Include Library` -> `Add .ZIP Library`, and choose the `Seeed_Arduino_rpcWiFiManager` file that you've have just downloaded.
### WiFiManager Auto Connect Example
This example is the demonstration of the auto connect example. You can use the example to set the WiFi settings for Wio Terminal.
- Upload the code to Wio Terminal.
- If Wio Terminal have connected to WiFi before, it will auto-connect to the same network. If it cannot connect to any WiFi it will go into AP mode and emit a WiFi. Use your phone to connect to this WiFi and input the WiFi settings.
```cpp
#include
#include
#include
#include
void setup() {
Serial.begin(115200);
while(!Serial); // wait till Serial is opened
WiFiManager wifiManager;
// Uncomment the resetSettings() will wipe out the saved settings
//wifiManager.resetSettings();
//Fetches ssid and pass from RTL8720 and tries to connect
//if it does not connect it starts an access point with the specified name
//here "AutoConnectAP"
//and goes into a blocking loop awaiting configuration
wifiManager.autoConnect("AutoConnectAP");
//or use this for auto generated name ESP + ChipID
//wifiManager.autoConnect();
//if you get here you have connected to the WiFi
Serial.println("connected...yeey :)");
Serial.println(WiFi.localIP());
}
void loop() {
// put your main code here, to run repeatedly:
}
```